Adding Sales Reps
Learn how managers invite sales reps to Sales OS, and how reps accept their invitations and get set up on both web and desktop.
Adding Sales Reps
Sales OS has two roles:
- Manager — creates playbooks, invites reps, and views analysis data for all reps
- Sales Rep — joins calls with AI assistance and views their own call data
This page explains how managers invite reps, and what the rep experience looks like when accepting the invitation.
Part 1: Inviting Sales Reps (Manager)
As a manager, you manage your team from the Sales Reps page inside your project.
Navigate to your project and open Sales OS > Sales Reps in the left navigation. This page shows a dashboard of your current team.
The Stats Dashboard
Two cards give you a quick overview of your team capacity:
- Current Sales Reps — the total number of active reps in your organization, with a help icon that opens step-by-step invitation instructions
- Max Allowed — the maximum number of members provisioned for your plan
If your team is approaching the limit, contact support to expand your seat count.
The Sales Representatives Table
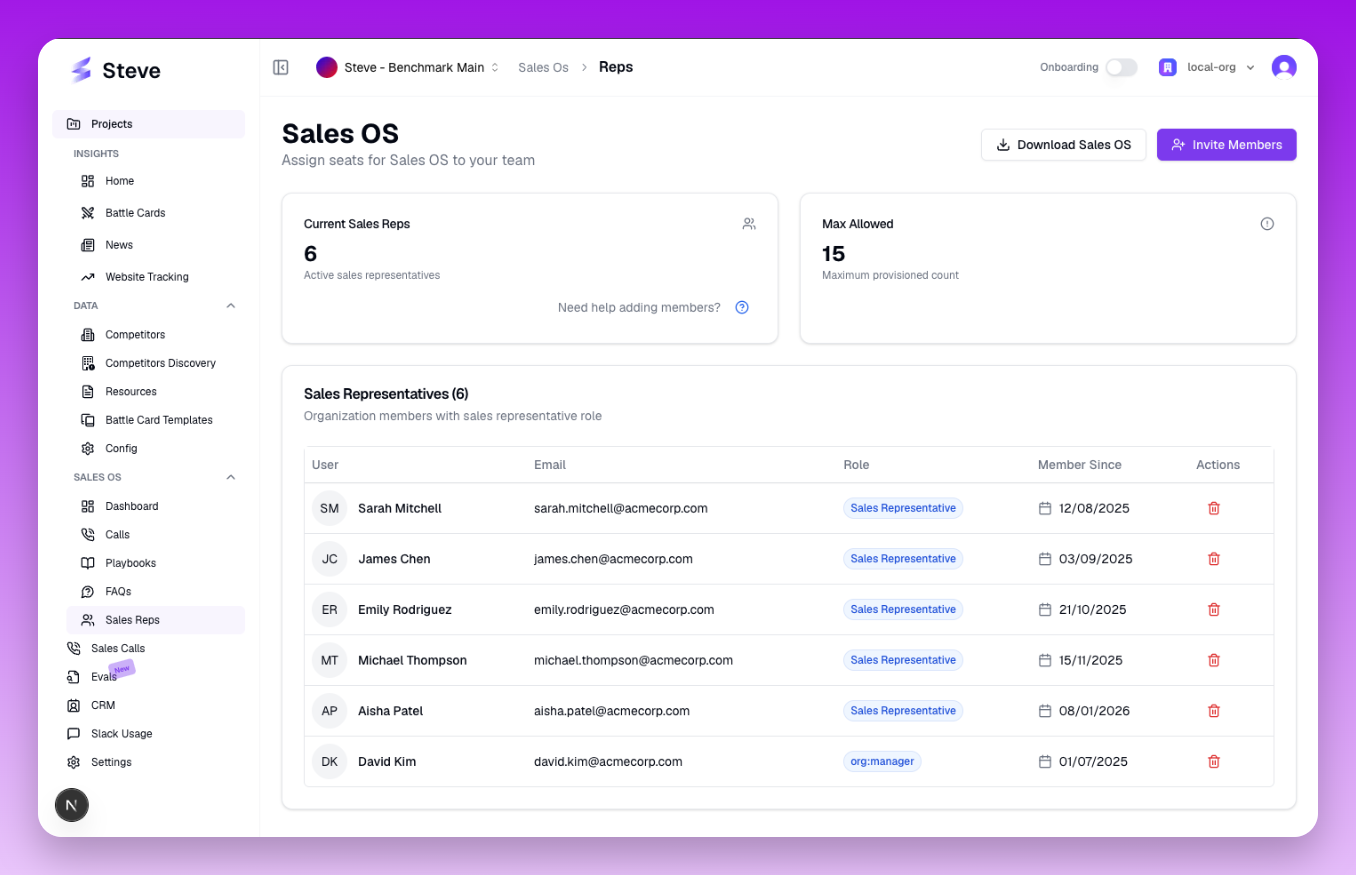
The Sales Representatives page — stats at the top, full team roster in the table.
Below the stats cards, a table lists every sales rep currently in your organization with the following columns:
| Column | Description |
|---|---|
| User | Avatar, first name, and last name |
| The rep's registered email address | |
| Role | Always "Sales Representative" for reps |
| Member Since | The date the rep joined the organization |
| Actions | (Manager only) Remove button to offboard a rep |
Inviting New Members
Click Invite Members in the top-right corner. An organization profile dialog opens.
In the dialog:
- Click the Members tab
- Enter the email address of the person you want to invite
- Set their role to Sales Rep
- Click Send Invitation
The invitee receives an email with a link to accept the invitation and set up their account.
You can invite multiple people at once by entering additional email addresses before sending.
Removing a Sales Rep
To offboard a rep, find their row in the table and click the Remove button (trash icon). A confirmation dialog appears — confirm to remove them. The rep loses access immediately.
Downloading the Desktop App (from the Reps page)
The Download Sales OS button at the top of the page opens a popover with direct download links for macOS and Windows. You can also copy the download URL to share with your team via Slack or email.
Part 2: Accepting the Invitation (Sales Rep)
When a manager invites you, you receive an email from Sales OS with a subject like "You have been invited to join [Organization Name]."
Step 1: Accept the Invitation
Open the email and click Accept Invitation. You will be redirected to the Sales OS web application to complete your account setup.
Step 2: Set Up Your Account
Follow the on-screen prompts to create or link your account. Once authenticated, you are taken to the Sales OS login page where you can see your account details and your organization.
Step 3: Download the Desktop App
From the login page (or the Sales Reps page if your manager shared the link), download the Sales OS desktop app for your operating system:
- macOS —
.dmginstaller - Windows —
.exeinstaller
Follow the Desktop Quickstart for the complete setup flow: installation, sign-in, permissions, and joining your first call.
What Reps Can See
Once set up, sales reps have access to:
- Their own past calls and real-time analysis during calls
- The playbooks assigned to their project
- Battle cards for competitive reference
- Prep sessions
Sales reps cannot see calls from other reps. Only managers have visibility across the entire team.
Next Steps
- Desktop Quickstart — complete setup for the desktop app
- Create Your First Playbook — give your reps a playbook to work with
- Calls & Analysis — see how managers review call data